So you’ve decided to go for it. You’re becoming a freelance writer.
You’ve set up your site, picked your niche, and maybe even have a few dream clients in mind.
But now you’re staring at the blank page and realizing: oh right, I actually have to write something.
Whether it’s a blog post for your portfolio, your own site, or a client gig, writing that first (or fiftieth) post can still feel overwhelming.
This guide breaks down how to write a blog post step-by-step — from idea to outline to final draft. We’ll also show you how to use AI tools (yup, they’re here to stay) to speed up your process without losing your voice.
Let’s do this.
But if you’ve got the basics down and want to know, “How do I write a blog post that actually makes me money?”
Don’t worry; we’ve got you covered there as well. This video goes beyond the basics of blogging and goes in-depth on exactly what you need to do to make money off a blog post:
Ok, ready to dig in?
Step 1: Know Your Audience
Before you write a word, ask: Who am I writing for?
Seriously. Most blog posts fall flat because they don’t speak directly to a specific reader.
Your job is to:
- Understand the pain points, goals, or questions your audience has
- Write in a tone they actually enjoy
- Focus on the problems they want solved
If you’re writing for a client, ask for a content brief or target persona. If they don’t have one? Ask questions.
If you’re writing for yourself, think about who you want to attract. A great blog post isn’t about what you want to say. Instead, think about what your reader needs to hear.
Step 2: Pick a Topic and Do Your Research
Your topic should solve a problem, answer a question, or provide value.
If you’re writing for a client, the topic might be assigned. If it’s your own blog, dig into:
- Keyword research
- Questions your audience is asking (Reddit, Quora, YouTube comments, specialty sites like G2, etc.)
- Your own experience or story
Then, research. Look for stats, expert quotes, case studies, and keep a list of quality sources.
But there are a few things to keep in mind here:
- Make sure you learn from reliable sources. There are a lot of clickbait-style sites out there that don’t provide great information.
- When possible, try to look to professional (governmental, educational, etc.) sites and known industry experts to learn more.
- Don’t be afraid to reach out to experts for quotes you can use in your posts. A tool like HARO is great for this.
- Save the sites, reports, whitepapers, etc., where you get your stats so you can link back to them in your post. Always try to link to the original source for any specific data and figures.
- Check out some AI tools for help. Remember, some are better for research than others.
As you become more comfortable writing, especially if it’s in a particular niche, you’ll start to see where the good sources of information are versus the not-quite-so-trustworthy sites.
AI Tip: Use tools like Perplexity or ChatGPT to brainstorm angles, summarize research, or surface FAQs. But don’t copy/paste. Use it to spark ideas, not do your job for you.
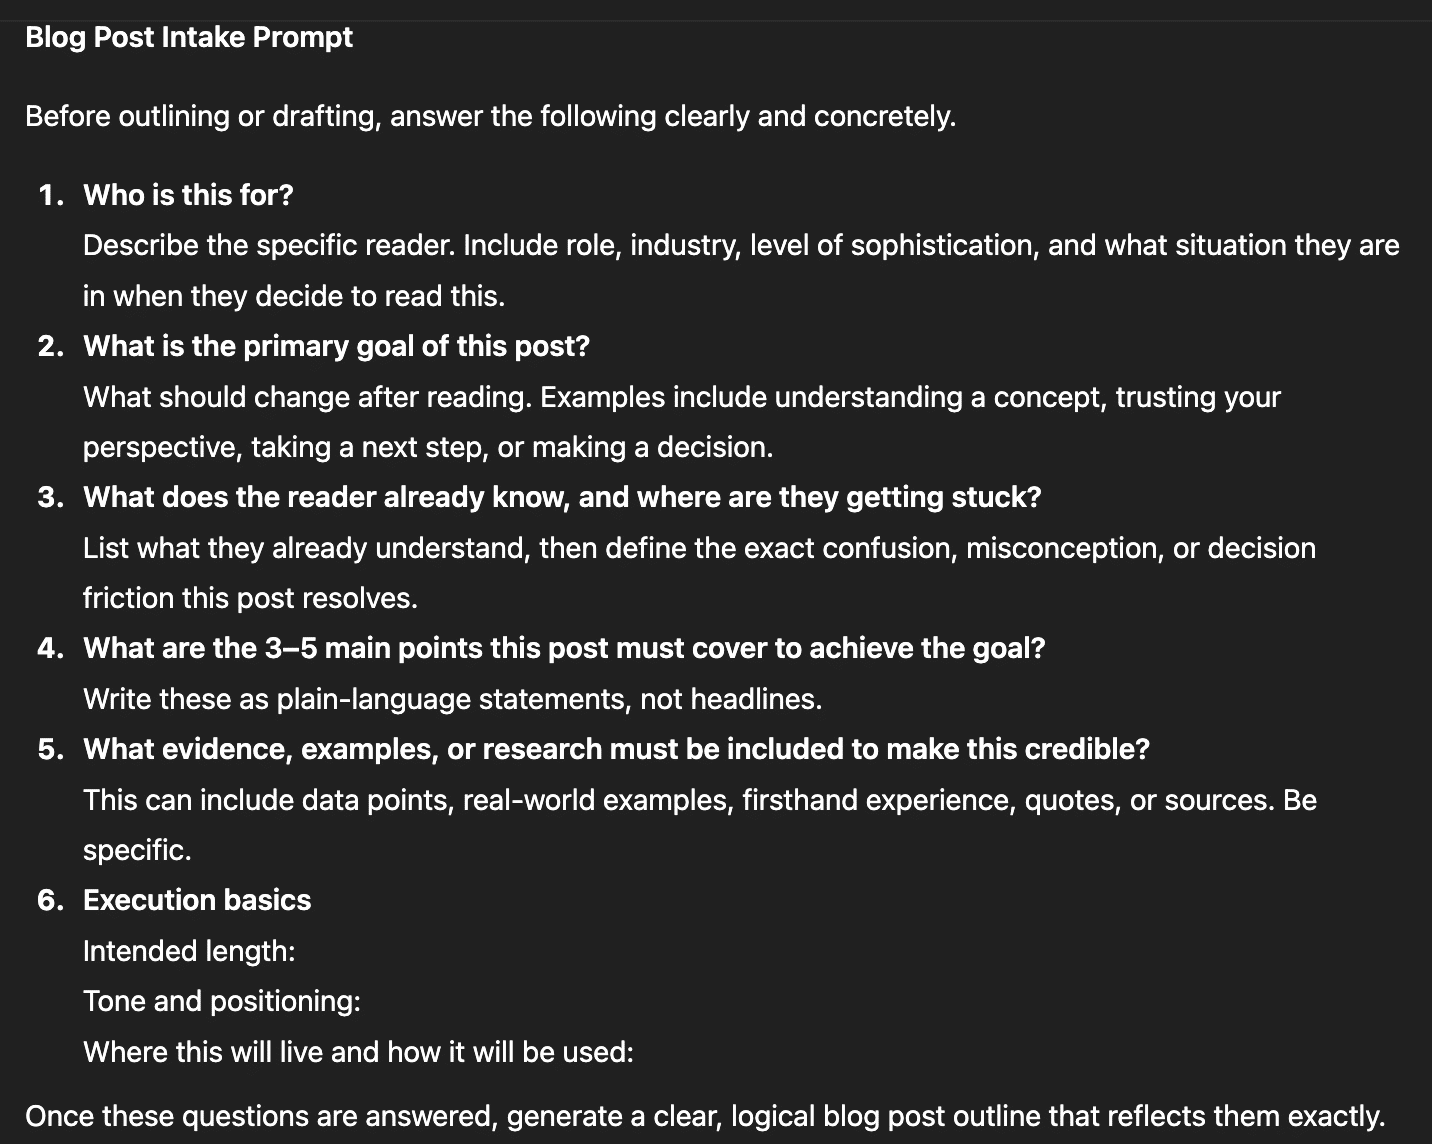
Step 3: Create an Outline
Outlining is the ultimate cheat code. I used to hate outlining, now I never write anything without a clear idea of where I’m going. A solid outline can take a little bit of time, but it can also make the writing process go so much more smoothly.
It helps you:
- Stay on track
- Hit key points without rambling
- Spot gaps before you write
Your outline should include:
- Headline (working version is fine)
- Intro idea
- Subheadings for each main point
- Bullet notes under each subhead that include research, quotes you want to use, main point, etc.
AI Tip: Try prompting ChatGPT. I love using an intake form version where it asks me questions and then creates an outline based on the answers. This means you still have to use your brain (which is a good thing).
Customize what it gives you. Even if it mostly sucks, it can help you get something down on paper, which helps writer’s block.
Step 4: Write a Working Headline
Good blog titles are specific, clear, and benefit-driven. They should:
- Solve a problem or answer a question
- Hint at the value inside
- Be optimized for search without sounding robotic
Here are some of the basics you want to think about as you craft your headline:
- Make it something readers want to click. Clicks are the currency of the internet today, so make it stand out (but don’t make it clickbait or have a headline that has nothing to do with the topic).
- Think about the problems your readers are trying to solve. People like reading stuff that helps them get answers. You clicked on this post because you had a problem writing a blog post.
- Get specific with your headline. It’s great to dig into your topic and let readers know exactly what they are going to learn.
- Look at other successful headlines. Great copywriters learn from the pros of the past and often recycle tweaked concepts or approaches. You can do the same. Just don’t copy something word for word!
- Come up with a bunch of examples. You’ll very rarely land on a killer headline on your first try. Write out 3-10 and see what stands out. Don’t worry if some of them suck just let it flow.
You’re not stuck with your first headline, it just gives your post a direction. You can fine-tune it later.
Here are a few good examples of headline structures to use.
Step 5: Write the First Draft
Now it’s time to get messy.
Use your outline as a guide, and just start writing.
Tips:
- Write like you’re talking to one person
- Don’t stress about perfection
- Add examples, metaphors, or mini-stories to make your points memorable
- Break things up visually with short paragraphs and bullet points
This isn’t your final product. You’ll fix the messy parts later. For now, just get the words down.
As you begin writing, here are a few things to keep in mind to help you craft compelling content:
- Have a good (short) introduction. You’re going to lose most of your readers in the first few sentences. So catch their attention from the start and make them want to keep reading the rest of your post.
- Use examples. Some of my favorite blog writers catch people in right from the start with an interesting example in the intro or sprinkled throughout the post.
- Break up your sentences. The first thing that will turn a reader off is a massive block of text. Have short paragraphs, and use subheaders and bullet points to keep the eye moving down the page.
- Be efficient with your words. Don’t ramble or go on and on to make a point. Don’t use big fancy words when simple ones will do. These writing tools can help.
- Keep the reader in mind. Remember, you are writing for someone. So you want them to learn something or have a laugh or fix a problem or get excited to buy a product. Always keep your reader in mind.
- Have a solid conclusion. Don’t add new information here but take a few sentences to summarize your post. Also, add in a call to action at the end to direct the reader to take another step.
As you write more, a lot of this stuff will become second nature to you. Writing is one of those skills that just takes practice.
And as you work with more clients, you’ll pick up good tips and feedback along the way that you can continue to incorporate into your writing for the future.
Step 6: Review and Edit (and Repeat as Needed)
Here’s where the magic happens.
After your first draft, take a break. Seriously. Even 30 minutes can get you to see things you missed before. In an ideal world, you’ll come back the next day.
Then come back and:
- Read your post out loud
- Tighten up sentences
- Cut fluff
- Check for flow and clarity
- Ensure you’re delivering on the promise of your headline
I also love reading my drafts outloud. I always catch something when I read outloud thaat I missed in my other reviews.
AI Tip: Use AI to identify structural issues or get suggestions. Try: “Can you give me feedback on this draft? Where could I improve clarity, flow, or engagement?” Then revise with your own judgment. If your client has a style guide use that as an input to ensure your content is hitting all their key markers.
Use Grammarly or Hemingway for grammar checks and reading level.

I can't think of a good reason why anyone shouldn't at least have the free version of Grammarly installed. It's SO incredibly helpful. And if you upgrade? It's even more useful. Here's a free month of Grammarly premium on us.
*Free plans and paid plans.
Step 7: Final Polish and SEO Check
Before you publish or send to a client, do one last pass.
Checklist:
- Headline is compelling and keyword-aligned
- Subheads are clear and scannable
- Links are accurate
- Keywords are included naturally
- Meta description is written (if needed)
- CTA is included at the end
Step 8: Publish (or Submit)
You made it. Hit publish or send that doc.
And give yourself a win, not just for writing a blog post, but for doing it like a pro.
Writing Blog Posts That Rank in AI Search (GEO Tips)
Search is changing fast. Between Google’s AI-powered search results and tools like ChatGPT, clients are starting to ask writers for content that’s optimized not just for human readers, but for AI-generated answers too.
That’s where GEO (Generative Engine Optimization, this is the new SEO) comes in. What you can do to help stand out is learn how to write content that AI tools identify, understand, and serve up as answers.
Here’s what to keep in mind when writing blog posts for AI-driven search in 2026:
-
Use proper headings (H2s, H3s) to break up your content and make sure each section answers a specific question or intent
-
Include bullets or numbered lists whenever appropriate (AI loves structure)
-
Don’t bury your answer 500 words in, instead lead with it and use clear, scannable phrasing like “Yes,” “No,” “Here’s how,” or “The short answer is…”
-
Link to original high-quality sources, not just random blog posts and reference studies, data, and known experts, where possible
-
Use internal links to related blog posts to reinforce topic clusters
-
The more topical depth your blog has, the more AI engines “trust” your site
-
Write strong, concise definitions, how-tos, or summaries and use simple, high-clarity language — think 8th grade reading level
You Got This
Writing a blog post isn’t just about getting words on a page. The best blog posts communicate clearly, solve problems for your reader, and create content that drives results.
Whether you’re writing for a client or building your own portfolio, the same fundamentals apply:
-
Know your audience
-
Stay focused with an outline
-
Write clearly, with purpose
-
Edit ruthlessly
-
Start thinking about how AI sees your content too
The more posts you write, the more confident and efficient you’ll get. So don’t overthink it. Just start. You’ll get better, land more work, and become the writer clients trust.
Now get out there and hit publish.

Sean Ogle
Sean Ogle is the Founder of Location Rebel where he has spent the last 12+ years teaching people how to build online businesses that give them the freedom to do more of the things they like to do in life. When he's not in the coffee shops of Portland, or the beaches of Bali, he's probably sneaking into some other high-class establishment where he most certainly doesn't belong.Join over 40,000 people who have taken our 6 part freelance writing course. Sign up below and let’s do this together.
By entering your email address you agree to receive emails from Location Rebel. We'll respect your privacy and you can unsubscribe at any time.